Blown-in insulation is one of the most DIY-friendly and cost effective ways you can insulate a house today. It can be a little messy but that shouldn’t discourage you from doing it yourself because the energy savings that you can get from one day of work will continue to pay for themselves year after year.
Combine the energy savings with the low cost of the materials unlike options like mineral wool or spray foam and you’ve got the perfect insulation for almost any attic. Most places where you can purchase blown-in insulation will even give you a free machine to use when you purchase your insulation from them.
There is no measuring and cutting and no waste unlike with batts. Blown-in insulation is as simple as it gets when it comes to insulating a house. It does have its limitations though and it isn’t perfect for every location or every house so keep reading to see if it is right for your situation and how to do it.
There are two main options when it comes to blown-in insulation in most of the country.
Both options provide similar R-values but there are some notable differences that I think make the decision a no-brainer. I have used both and I greatly prefer using cellulose for a few reasons:
Those are some serious advantages in the favor of cellulose! When I insulated my house, I had no agenda other than to get the most bang for my buck in terms of insulating power and use the most eco-friendly product. Cellulose meets both of those requirements.
The easiest way to get started is in your attic. For most climates, adding a thick layer of insulation here will give you the greatest return on your investment.
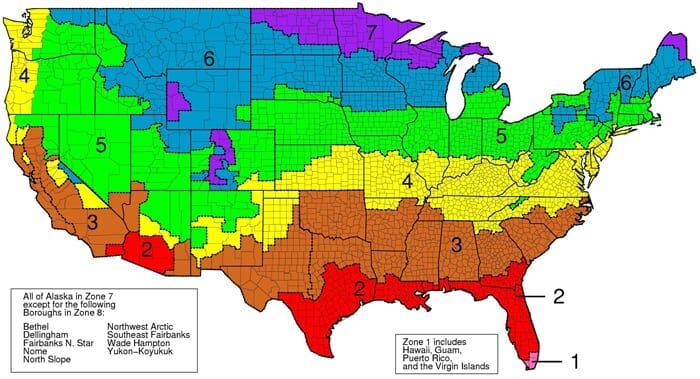
How much insulation do you need? For most areas of the country, R-30 is the bare minimum, but you should definitely go higher than that, especially in colder climates.
Cellulose insulation is pretty affordable (around $12 per bag) and while you have the machine and you’re already getting messy, I would add as much insulation as possible.
Click on the map below to see the recommended R-values for your area.
Let’s start talking nuts and bolts here. You will need the following things to get the work done:
Cellulose insulation isn’t a health hazard, but installing blown-in insulation does make a dusty mess and you want to protect your eyes and avoid breathing the dust filled air as much as possible. You also don’t need to worry about wearing long sleeves since cellulose doesn’t make you itchy like fiberglass.
I’m sure other hardware stores have similar deals, but I have to give Home Depot credit on this one. They will give you a free rental of an insulation blower if you purchase 20 bags or more of insulation. Not bad!
The blower comes with a long hose so you don’t have to haul it up the stairs if you don’t want to (which I don’t recommend because this thing is a heavy beast).
Setting up the blower is pretty straight forward. You just attach the hose, plug it in, and load some insulation into the hopper. You will need a helper to keep loading bags into the machine while you use the hose to direct the insulation where you want it, otherwise you will be crawling back to the hopper every 5 minutes.
You’ll need to install the cellulose all across the attic floor starting from the furthest sections and working your way back to the exit. Blowing in insulation in this manner will give you what’s called “loose-fill” insulation.
The power of loose-fill is in its ability to slow down air and heat transfer through the thick fluffy blanket you blow in. This is different from “dense-pack” installation methods which are a little more complicated.
That being said, your goal here is to create the fluffiest covering of cellulose you can. Don’t blow it in and try to pack it down. It will settle a bit over time so always fill more than you think you should. When I say fill more than you think go big because the settlement factor over that first 6 months to a year is big! I lost about 4 inches to settlement and wish I had installed more.
I would recommend a minimum of 10″ of loose fill for an attic floor, which should give you about an R-30 rating. But like I said earlier, if you’re gonna do it, you might as well do it right and add as much as you can.
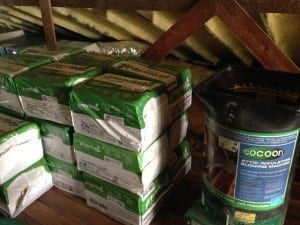
To give you an idea of how much insulation you’ll need, GreenFiber has a coverage chart on their website to help you do the math. I found that the chart is pretty much right on.
For my 1300 SF house, I decided to get about an R-36 rating which required about 45 bags in my case. I could have done more but we already have spray foam on the underside of the roof deck so that put me at a total of about R-43 in the attic, which is well above what is recommended for our Florida climate.
It took me one full, very dirty day to get it all done and cost me $581.33. For that price, I can make that money back in energy savings easily within the first year. After that first year, that’s money in my pocket!
So, if you haven’t already done it, put some insulation on that attic floor. Maybe you’ll get to insulating the walls someday, but the place to start is where you’ll get the most bang for your buck with the least possible downside, and that’s the attic.


Scott Sidler
Founder & Editor-in-Chief
I love old houses, working with my hands, and teaching others the excitment of doing it yourself! Everything is teachable if you only give it the chance.
I’m (extensively) renovating a 1912 Craftsman in San Diego (relatively mild and dry). Most of the plaster is damaged beyond repair and has or will be removed. So I have studs on the inside. The outside is shingles, nailed to strapping with no insulation or membrane, that is staying on. Seems like I should put something there before I replace the missing plaster with drywall, but there’s a lot of varied information to meet the wide variety of situations across the country. Any rules I can start with? Suggestions where I might go for expert advice? Thanks, Tom
Jim Conor says:I definitely agree that cellulose insulation is a lot better than fiberglass, especially if you’re having to blow it into an attic. My dad and I used to install attic insulation all the time when I was a teenager and I was so happy when he stopped using fiberglass because of how itchy it would be if you got it on your skin. Unfortunately, blowing insulation by yourself requires two people, one who puts the insulation in the machine and one who operates the hose, so it might be better to have a professional do it if you’re short-handed.
danielvhenny says: Blown insulation is eventually spread in all places than anyother insulation types. danielvhenny says: It is very useful steps to install attic .thanks for posting. danielvhenny says: THANKS FOR POSTING .REALLY INFORMATIVE ARTICLE Bernie LaFrance says:Thanks for your reply. I read Bob Yapps’s article and DOI page per your link and now I am even more perplexed.
I hear what Mr. Yapp is saying but the exact conditions are not clear. He states “ I’ve inspected thousands of old houses with blown-in insulation and over 80% of them have this wet insulation problem.” That means to me there are well over 800 homes are potential plaintiffs in a lawsuit. One could make a living from that.
For the homes he is speaking of I can only conclude the application of dense pack insulation is inappropriate for the specific structure and environment. For instance he mentions vinyl and stucco siding in northern climate; factors I can see trapping moisture. I can understand warm moist air migrating from the interior to the cool inside face of the non porous vinyl or stucco exterior causing moisture to condense then migrating and collecting in the lower portion of the wall cavity. Basically the problem is the vapor barrier is on the wrong side of the wall for a northern climate. An interior vapor barrier is needed for that zone no matter what type of insulation is used.
I think my case with original wood lap siding is an exception. My home interior plaster consists of soft lime mortar/horse hair with plaster finish. A later addition is Portland cement based. 5/8” green board drywall and plaster skim coat, PVA primer and latex finish will eventually be the interior finish where the soft plaster is failing. The third floor has had an extensive treatment of ¾” foam board spaced ¾” from the roof sheathing, 3 ½” Rockwool batting insulation and 5/8” drywall. A careful design that allows airflow from the ridgeline under the sheathing to the roof peak that serves as a plenum for the ventilator a dramatic improvement in interior comfort while maintaining good air flow under the roofing.
The exterior outer sheathing is ¾’ x 6” boards on diagonal with an average of 1/8” gap between them then rosin paper that is frail and missing in portions and lastly Dutch lap Douglas fir siding that is for the most part in sound and stable condition – in short a very porous exterior and sketchy at best interior. Reading the CIMA articles http://www.cellulose.org/index.php as well as the DOE and Green Building Adviser are leading me to conclude that at least in my case careful installation of dense pack cellulose with no vapor barrier at all is the best choice. I will continue to research it but that is the direction I am headed at this time.
Thank you for your input.
You have done your homework and if you think that is best, I respect your decision. A lot of times there isn’t a clear cut answer and it will maybe 10-20 years to find out if there is accumulated damage. By then, the contractors are long gone. Bob Yapp founded a home inspection company called House Doctor and sold it after 4 years (it is now a national franchise) and has consulted on many historic renovations, so I have the highest respect for his opinion. Your roof assembly is ventilated, so it should be fine. I’m not so sure about the walls. There is a lot of difference of opinion on this. I have asked him about this in person since I live in a far colder climate than you do. Problems with the Joseph Smith house is an example he likes to cite. He is a preservation consultant for Nauvoo, the Mormon town and National Historic site on the Mississippi River in Illinois with about 200 historic, mostly wood, structures. There is a professional maintenance staff, staff historians and thousands of visitors per year. This is a sacred site for Mormons and it had been carefully preserved. But they couldn’t figure out why paint wouldn’t stay on the Joseph Smith house, which is typical balloon frame wood construction, something like your home. He removed a few rows of lower siding and sheathing and found sopping wet cellulose insulation, and a nasty infestation of carpenter ants that threatened the structure of the building. It all was pulled out, the cavities ventilated to dry out, insects fumigated, portions of sills and rotten studs repaired and replaced, and the whole works repaired, replaced, stripped and repainted. They haven’t had paint problems since. What a nightmare. Now, I know of houses that have insulated their wall with cellulose in my own town, and the energy consultant I hired recommended it. Apparently so far they are doing fine, but it depends on a lot of factors, like how humid the local climate is (very humid by the Mississippi and the Chesapeake), how many people live in the structure, how well ventilated that structure is, especially in the bathrooms and kitchen (not just present, but used), if the ground floor is well elevated above ground and snow level, and if you use air conditioning. As you probably read on Green Advisor, three coats of acrylic paint make a pretty good interior moisture barrier and vinyl wallpaper is even better, and it is advisable to insulate wall sockets and light switches and caulk on the inside around windows and baseboards. That old tar paper under the siding holds and releases a lot of moisture too (better than modern materials)–Scott has a good article on it here. So if you are really careful, don’t have a houseful of teens who take really long showers, and maybe even invest in a dehumidifier or a heat exchanger if the house is really tight (have it checked after you complete improvements, open the windows once in a while for some fresh air, then you might be OK. Just keep an eye on the exterior paint. If it starts to peel badly, then that could be a sign of moisture problems. I still think the jury is out on it, for old and new houses. There are plenty of newish houses with improperly installed moisture barriers, or barriers that actually trap moisture. We have lots of foreclosure houses with mold problems since the utilities were shut off, and we will find out in the future how well the others have held up. Lots of things that were “standard practice” in the day were found to be problematic, some rather quickly, such as aluminum wiring, polybutyl plumbing, Chinese drywall, 1970s foam insulation, organic shingles, vented crawlspaces, unvented gas fireplaces, moldy composites, etc., etc.. I know of a contractor who had a high efficiency house built for himself a couple of years ago, and has nothing but problems with trapped moisture. He has 6 kids and lots of showers and laundry, and it creates more moisture than the house was designed for. He has to keep the ventilation fans running nearly all the time, and open his windows periodically for short periods in the winter to keep his windows from having water condense on them. That pretty much cancels out the savings he was hoping to get. A bigger heat exchanger might help, but it is an expensive retrofit. So even professionals can have problems with this.
Bernie LaFrance says:Thank you for the extensive reply. I will take your advice under serious consideration and continue research before I commit to the project.
One problem that must be addressed first is the lack of proper drainage and rainwater control on the north side of the house, in the worst of weather water pools in the window sills.
Classic wood storm windows, regarding of the yard and of course gutters and downspouts are top priority before insulating. Thanks again – I will be recording and sharing progress.
Perhaps you would like to download Scott’s maintenance form to help you stage what you want to do. It is not that expensive and can be a big help! I agree drainage is a bigger concern, and it sounds like wind is driving rain into your window sills. Don’t ditch the wood storms. There are a lot of advantages to them, including the ability to easily remove them to maintain your windows. You can buy hangers and stays to prop them open on nice days before the bugs arrive, and that will help dry out the sills. Lowe’s and other places sell adjustable screens you can prop into your windows if you wish, or the old storms can be retrofitted with a removable glass and a screen panel(s), which can be accessed from inside. These are great because then you can use double hung windows the way they were meant to be used–with the top lowered and the bottom raised to allow airflow–hot air out the top and cool air in the bottom. Works great. Storm and wood window hardware can be purchased at suppliers like Smith Sash Restoration, House of Antique Hardware and Crown City Hardware. This is a little off-topic, but storms can be weatherstripped to help block some of that water coming in–possibly EPDM brush seals or bulb type, or silicon bulb, routed into the sides or front of the storm, depending on how the stop is and how well it fits. Always allow for bottom drainage. Bob Yapp has a class on Storm Window construction (with the removable panels)and there is information on John Leek’s blog. Interior storm/air panels (see Leeke’s blog) can be helpful if the windows are leaky. Of course, take a look at Scott’s stuff here on window repair and weatherstripping as well. He is one of the few places online that really has instructions for sprung
bronze weatherstripping, and info on steel casement window repair. Those sills might need repair, and you can find instructions on epoxy repair here and on John Leeke’s blogs as well. If you don’t use Abatron, West Systems can be good for nearly flat surfaces, although it dries rather hard and needs a belt sander to smooth down. One difference Bob has with Scott’s procedures is that he used UGL Glazol Glazing Putty rather than Sarco Type M. He mops up the excess oil and replaces it with boiled linseed oil–around 1/8 C for the whole can plus a couple of drops per handful kneaded until workable. You might be able to do something similar with Sarco. Years ago, these putties were made only with linseed oil, but now there is soy and other oils in it, which slows down cure time. I just came from a window workshop and I can attest that putty this way can cure within a day or two enough to paint. Sarco will fail if painted too soon, and can take 2-6 weeks to cure, depending on conditions, and longer is better. Whatever you do, don’t use DAP 33–it has a terrible record for holding paint. UGL can be special ordered online or by most lumberyards.
Bob Yapp does not know what he is talking about. Here is a post I wrote in response to his article in another blog. I’m not sure I buy into Bob Yapp’s article. Plaster has a rather high thermal conductivity when compared to drywall. So plaster is not better at keeping heat in or sound out. As a matter of fact it’s worse, much worse. I do agree that blocking off the airflow from basement to attic is a good idea. A little discussion of the physics behind condensation would be a good place to start. Condensation occurs when warm most air comes into contact with a substance that has high thermal conductivity that is at a temperature colder than the air. The heat energy of the air in contact with the substance is transferred to the substance and the air molecules, once cooled, can no longer retain the moisture between them, which condenses in the form of water droplets on the substance. The reason that vapor barriers keep warm moist air out of the insulation is because they have low thermal conductivity or high thermal resistance. Therefore the warm moist air cannot give up its heat energy to the plastic barrier and no condensation can occur. The interior of the house walls do act like a chimney because warm air is less dense, and lighter, than cold air and the heated air will rise from the basement to the attic in the spaces between the studs. Insulation is not used to provide a thermal barrier between the interior and exterior of the house directly and its primary function is the restriction of airflow and here is why. The thermal resistance of Air is far better than Fiberglass so why do you need Fiberglass at all? Fiberglass will stop the convection airflow through the wall from basement to attic and trap the air in the wall. It’s the convection airflow that is robbing the heat from the house and once the insulation is installed it will stop this airflow.
Kathy says:In summary, wall insulation in old houses is problematic because: 1)It traps moisture and creates the perfect conditions for mold and insects, potentially rotting the house from inside. 2)Once cellulous insulation becomes damp, it loses much of it fire-retardant and insulating qualities. 3) Fiberglass and rock wool are possibilities but have their issues as well. Blown rock wool is hard to find and fiberglass is not a good insulator unless the cavity is air sealed first, and animals love it for their bedding. They have the same moisture retention issues as cellulous. Rock wool may be marginally better because it is mold and fire resistant. 4)Foam is also very easy to overfill, is not easily removable, makes rewiring and such nearly impossible unless chases are installed, and can shrink with time. All foams use propellants that are not terribly environmentally friendly. 5)It is very easy to overpack the cavity with any blown-in insulation and damage the plaster and lathe, especially for a DIYer. Tearing out all the plaster is messy and expensive, can release a lot of lead dust into your home, and you will lose thermal mass, sound insulation, historic character and likely damage historic woodwork in the process. Maryland has a fairly mild humid climate for the most part. Ventilated wall assemblies are a good thing. I would put my money in other energy saving options for a bigger payback and less risk of long-term damage.
Bernie LaFrance says:Hello,
I have been studying dense pack insulation for my 1910 home. I am an above average DIY and have access to a proper blowing machine. I understand all the pitfalls and methods of addressing them.
My question is I do not know of any homes in my area, Maryland that have had this work done.
What is your personal experience with homes that have dense pace cellulose installed – chiefly, how has it preformed over time? I did a few bays by hand(long story)and am very impressed so far. My biggest worry is with diagonal plank sheathing,Dutch lap siding on failing paper backing and little or no interior vapor barrier on the inside is there a potential for moisture issues? What sort of failures have you or your readers seen?